Vector Brushes
What are Vector Brushes?
Vector Brushes in Animate CC offer you a huge workflow boost because
of the word “vector” in the tool’s name. Animate CC works with vectors
meaning objects created with a brush can be animated. As well, any brushes
saved to your Creative Cloud library, including those created in Adobe
Capture, can now be used as a brush in Animate CC.
Another really interesting addition to the Animate CC line-up is a
serious improvement to the Onion Skinning feature. In earlier versions,
Onion Skinning was interesting, but limiting, in that you could only “onion
skin” a set number of frames and identifying previous and future frames was
a bit difficult. This has all changed in Animate CC 2015.
Color-coding and the ability to set your own range of views lets animators
easily see how a range of frames in an animation relate to each other and
empowers them to quickly identify and fix any issues detected.
In this exercise we are going to take a closer look at these two features by
visiting a moon rise on Lake Nanagook. We will be adding foliage to the shore
of the lake using the new Vector Brush and have it gently wave in the breeze.
We will also animate the moon rise, and use the improved onion skinning
feature to review, frame-by-frame, that moon rise. Let’s get started:
Open the MoonOverLakeNanagook.fla file found in your download. When it
opens you will see a series of layers with some foliage in the foreground. If
you press Command-Return (Mac) or Control-Enter (PC) will see a quick
preview of the SWF file.
Using The Vector Paintbrush
The plan is to add a couple of pieces of foliage in that space that is open in the
Foliage layer.
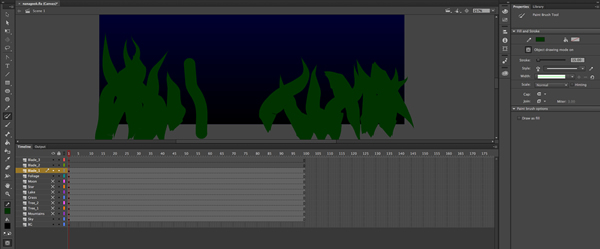
1. To start, turn off the visibility of all the layers except the Foliage and BG
layers. This will remove any distractions as you concentrate on the
creating the foliage.
2. Add three new layers to the timeline named Blade_1, Blade_2 and
Blade_3.
3. With the Blade_1 layer selected, click on the Paint Brush Tool (Y). When
you select the Paintbrush the Properties panel will switch over to the
Paint Brush Tool properties.
4. Click once on the color chip beside the Pencil in the Properties panel and
sample the color of the foliage.
5. What we need is a vector. To accomplish this click once on the Object
Drawing button in the Paint Brush Tool Properties panel to turn on
Object Drawing Mode.
6. Set the Stroke width to 15 pixels and paint a line in the space. You will
have a thick rounded line
Obviously, a thick rounded line isn’t exactly what we are looking for here.
Let’s make it look like some foliage.
Using Brush Styles in Animate CC
One of the really neat features of Animate CC is the ability to use a
variety of brushes that are installed with the application. Let’s change that
line to something more leaf-like.
1. Select your line and click the brush Library button- it looks like a coffee
cup with paint brushes sticking out of it- in the Properties panel. This
will open the Brush Libraries panel.
2. The Brush Libraries Panel shows you the categories –Arrows, Artistic,
Decorative, Line Art, Vector Pack and CC Library- on the left side of the
panel. Click a category and a listing of Brush Types appears. Click on a
brush type and you will be presented with a number of brush styles.
3. To add apply a brush style to your selection double click the one you
want. In this case I chose Artistic>Ink> Calligraphy 2.
4. If you want a slightly different-looking leaf, click the Variable Width pop
down and choose from a selection of possible widths. In this case, I
chose Width Profile 2.
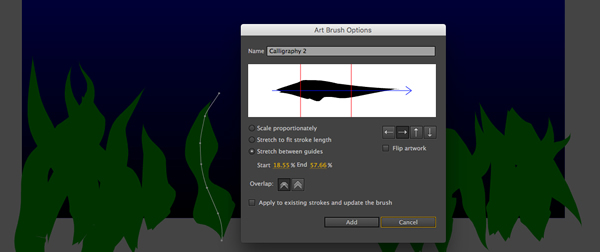
5. You can also refine the stroke of your object by clicking the Pencil icon to
open the Art Brush Options panel. By dragging the the red guides inward
or outward you can stretch out the object or choose Scale
proportionately or Stretch to fit stroke length to change up the look of
the stroke. Once you are finished, click the Add button to apply the
change and close the panel. For a more comprehensive overview of
editing brushes point your browser here.
Using A Brush From Your Creative Cloud
Library
You don’t necessarily need to use the Paint Brush Tool to create objects. You
can also use the Pencil Tool and apply any brushes you have saved to your
Creative Cloud Library. Here’s how:
1. Select the Blade_2 layer , select the Pencil Tool in the Tools panel and
draw a line. You should notice the properties from the Paint Brush are
applied to this object. I want to use a brush created in Adobe Capture on
my iPad.
2. Click the CreatIveCloud icon or select Window>CC Libraries. This will
open your CreativeCloud Library. Scroll through your Library to the
Brushes section. If you have a collection of brushes, you will notice a few
of them are not lit up. Only vector brushes, including any created in
Illustrator can be used in Animate CC 2015.
3. Select your brush to apply it to the new object. If you open the Brush
Library and select CC Library, you will see this brush has been added to
the lineup.
4. Now that you know how to create and edit brushes add a new object to
the Blade_3 layer.

Animating Vector Brush Artwork
With the three bits of foliage drawn with a vector brush the time has arrived
to put them in motion. The key to this technique is that each object drawn
with a Vector Brush is regarded by Animate CC 2015 as a shape if you intend
to move the anchor points to change the object. This means you need to use a
Shape Tween, not a Motion Tween, if you want them to animate. Here’s how:
1. Add a keyframe in three or four frames along the Blade_1 timeline.
2. Right click between the keyframes and select Create Shape tween. The
span will turn green with an arrow between the keyframes.
3. Select the second keyframe, switch to the Subselection tool – the hollow
arrow- and click on the object. The vector will light up.
4. Move a couple of of the vector points and scrub the playhead across the
Shape tween.
5. Repeat these steps for the Blade_2 and the Blade_3 layers.
6. Test the movie by pressing Command-Return (Mac) or Control-Enter
(PC).
There will be occasions where you may want to examine an incremental
changes in an animation on a frame-by-frame basis. This is where Onion
Skinning comes in. In previous versions of Animate CC 2015, onion skinning
was somewhat difficult. Quickly seeing which were the earlier and later
frames in the animation was problematic and trying to see a frame-by-frame
animation longer than 5 frames meant you did the onion skinning on a
piecemeal basis. Animate CC 2015 makes this process a lot easier.
Animate CC 2015 contains two ways of onion skinning: Frame-By Frame or
Outline view.
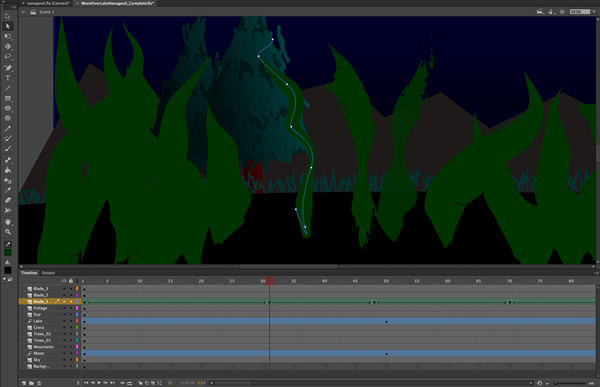
The first is to click the Onion Skin button, as shown in Figure 6, and the
frame span shows the object. Earlier frames are colored blue and later frames
are colored green. As well Opacity for the colored frames decreases based on
their distance from the marker. Not only that the markers for the Previous
and Future frames are also color coded so you always know where the frames
are located in relation to the play head.
The Outline view is ideal for objects that move a short distance between the
markers. The outlines are color-coded and the current frame is shown by a
red outline. You should also note the opacity of the outlines also decreases
based on their distance from the playhead.
Another nifty new feature is the ability to expand the span of frames between
the Previous and Future markers. If you have a frame-by-frame animation
that moves across 20 frames you can drag out the markers to span that
distance on the timeline. In fact you don’t even have to click and drag a blue
or green marker. If you move the cursor close to a blue or green marker it will
change to a double-arrow cursor. A small change but welcome all the same.
Conclusion
The ability to create and modify Vector Brushes in Adobe Animate CC is
feature that has been well worth the wait. Being now able to choose from a
range of custom brushes packed with Animate CC or the ability to use brushes
created on a smartphone or tablet in Adobe Create or in Illustrator CC truly
expands the creative possibilities available to the digital artist.